Send selected text to a web search engine, a translation service, an API or a local program. Built-in services are in the selection context menu, and you add your own with the
SelectionHandlers advanced setting.Available in version 3.4 or later.
Most people use it to search or translate a selected word or phrase. At a glance:
- Search / translate: right-click selection →
Selection→Search with/Translate with(Google, Bing, DeepL, …). - Command Palette:
Ctrl + K, then e.g.deepl. - Add a service: an entry in
SelectionHandlerswithURL,Name, optionalKey(ver 3.6+). - Selection toolbar button (ver 3.7+):
SelectToolbarNameOrSvg. - Main toolbar button (ver 3.7+):
ToolbarText/ToolbarSvgIcon. - Long text, APIs (ver 3.7+):
Method = POST/POST-VIA-BROWSER. - Run a program:
Exeinstead ofURL.
Search or translate the selection #
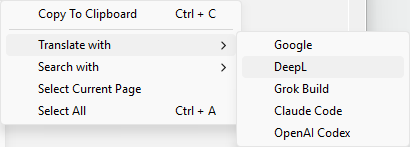
You can send selected text to the Google or Bing search engine, or to the Google or DeepL translation service.
With the mouse:
- select text
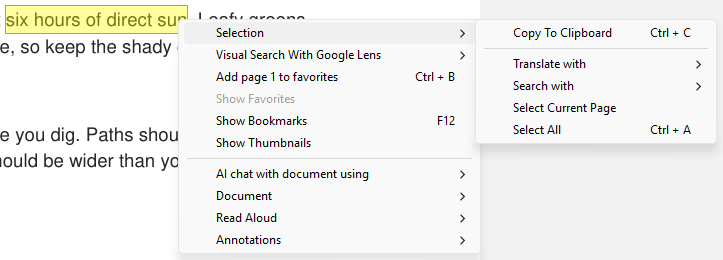
- right-click to open the context menu
- use the
Selectionsubmenu, thenTranslate withorSearch with, and select the web service:
With the Command Palette:
- select text
Ctrl + K,Translate Selection with DeepLcommand (typedeeplto find it)

- press
Enter(or double-click with the mouse) to execute the action
Add a service #
- Menu: Settings → Open Advanced Settings File… to open the configuration file.
- Modify the
SelectionHandlerssection.
The following entry adds the DuckDuckGo search engine:
SelectionHandlers [
  [
    URL = https://duckduckgo.com/?ia=web&q=${selection}
    Name = &DuckDuckGo
    Key = Ctrl + t
  ]
]
URLis the website that will be launched.${selection}is replaced with the current selection, URL-encoded as a query value (spaces become%20, and reserved characters such as?,",&and#become%XXso they are not parsed as more URL syntax).Nameis what appears in the menu. Use an&character to add a Windows hotkey for keyboard-only invocation.- Ver 3.6+:
Keyis a keyboard shortcut in the same format as in theShortcutsadvanced setting.
Add a button to the selection toolbar (ver 3.7+) #
Selecting text pops up a small toolbar over the selection (turn it off with
SelectionToolbar in advanced settings). SelectToolbarNameOrSvg puts the handler on it, so sending the selection to a service takes one click instead of opening the context menu:SelectionHandlers [
[
URL = https://duckduckgo.com/?q=${selection}
Name = &DuckDuckGo
SelectToolbarNameOrSvg = Search
]
]
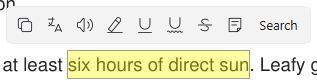
The value is the button’s text. Keep it short, because the toolbar sits over what you are reading, and every handler you add makes it wider. Unlike
Name, the value is shown as you typed it, with no & hotkey handling and no translation.If the value starts with
<svg, it is drawn as an SVG icon instead of the text. The format is the same as ToolbarSvgIcon in Customize toolbar. The icon is 24x24 with stroke="currentColor" and fill="none", so it picks up the theme’s text color, and has a full-size <rect> so its background comes out transparent. The icon is rendered at ToolbarSize, the same as main-toolbar icons, and the handler’s Name is its tooltip. Tabler Icons are already in that shape:SelectionHandlers [
[
URL = https://duckduckgo.com/?q=${selection}
Name = &DuckDuckGo
SelectToolbarNameOrSvg = <svg xmlns="http://www.w3.org/2000/svg" width="24" height="24" viewBox="0 0 24 24" stroke-width="2" stroke="currentColor" fill="none" stroke-linecap="round" stroke-linejoin="round"><rect x="0" y="0" width="24" height="24" stroke="none"></rect><circle cx="11" cy="11" r="7"></circle><path d="M21 21l-4.35-4.35"></path></svg>
]
]
Handlers without
SelectToolbarNameOrSvg are unaffected and stay in the context menu and the command palette.Add a button to the main toolbar (ver 3.7+) #
Set
ToolbarText (a short label) or ToolbarSvgIcon (same SVG format as Customize toolbar). If both are set, the icon is used:SelectionHandlers [
[
URL = https://duckduckgo.com/?q=${selection}
Name = &DuckDuckGo
ToolbarText = DDG
]
]
Choose which buttons are on the selection toolbar (Ver 3.7+) #
SelectionToolbarLayout lists the built-in buttons you want, in the order you want them. It works the same way as ToolbarCustomLayout for the main toolbar:SelectionToolbarLayout = CmdCopySelection | CmdCreateAnnotHighlight CmdCreateAnnotUnderline
- entries are command ids, separated by spaces (commas and semicolons work too)
|(orSeparator) inserts a separator- to hide a button, leave it out
- an empty value (the default) is the standard set
- names that aren’t selection-toolbar buttons are ignored (see the log with
-log) - handler buttons from
SelectToolbarNameOrSvgstill come last
The standard selection toolbar written out:
SelectionToolbarLayout = CmdCopySelection CmdTranslateSelection CmdReadAloudSelection CmdCreateAnnotHighlight CmdCreateAnnotUnderline CmdCreateAnnotSquiggly CmdCreateAnnotStrikeOut CmdCreateAnnotText
Send long text (ver 3.7+) #
A URL can only hold so much text. If you select several paragraphs and send them
to a service with the default settings, the text is shortened to fit and you get
a notification saying so.
Method controls how the selection is sent:| Method | Length limit | Sees your browser session | Custom headers | Shows result |
|---|---|---|---|---|
GET (default) |
~8000 chars | yes | no | in a browser tab |
POST |
none | no | yes | in a notification |
POST-VIA-BROWSER |
none | yes | no | in a browser tab |
If
Method is missing or is GET, a handler behaves exactly as it did before
3.7, so existing settings keep working unchanged.Why the GET limit exists #
With
GET the selection has to fit in the URL, and URL-encoding makes text
bigger, sometimes much bigger:- an ASCII letter stays 1 character
- a space becomes
%20and a newline becomes%0A, 3 characters each - a Chinese, Japanese or Korean character is 3 bytes of UTF-8, so it becomes
%XX%XX%XX, 9 characters
So the same budget is roughly 8000 Latin characters but only about 900 CJK
characters. When the text doesn’t fit, SumatraPDF shortens it at a character
boundary (never in the middle of a character) and tells you it did.
Use
POST or POST-VIA-BROWSER when you need to send more.Method = POST #
SumatraPDF makes the HTTP request itself and puts the selection in the request
body, so there is no length limit. Use it for API services:
SelectionHandlers [
  [
    Name = Send to my API
    URL = https://example.com/api/summarize
    Method = POST
    Headers = Authorization: Bearer my-secret-key
  ]
]
Bodyis the request body. If you leave it out, the body is the raw selection and nothing else.ContentTypesets theContent-Typeheader. Default istext/plain; charset=utf-8, which matches the default raw-selection body.Headersare extra headers, one per line. A settings value is a single line, so separate them by typing\n:Headers = Authorization: Bearer key\nX-Client: sumatrapdf
The request is made by SumatraPDF, not by your browser. The service does not
see your cookies or logins, and whatever you put in
Headers is the only
credential it gets. An API key in Headers is usually all you need, but
POST will not work with a site that expects you to be signed in. Use
POST-VIA-BROWSER for those sites.The response is not rendered. You get a notification with the HTTP status code
and the beginning of the response body, which is enough to see whether it worked
and what the error was.
Method = POST-VIA-BROWSER #
SumatraPDF writes a small temporary HTML page containing a form that submits
itself, and opens it in your default browser. There is no length limit, and
because your browser sends the form, the service sees your normal session,
including cookies and logins. Use it for a site you’re already signed in to.
SelectionHandlers [
  [
    Name = Send to my web app
    URL = https://example.com/analyze
    Method = POST-VIA-BROWSER
    Body = text=${selection}&lang=${userlang}
  ]
]
Body is a form-encoded template: name=value pairs separated by &. Each
value becomes a hidden form field. If you leave Body out, a single field named
text is sent.The template is split into fields before substitution, so a selection
containing
& or = can’t accidentally create extra fields.ContentType and Headers are ignored here, because a form submission always
posts application/x-www-form-urlencoded and cannot set custom headers. If you
need an Authorization header, use Method = POST.Some sites reject a form submitted from a local file (CSRF protection). If that
happens, use
POST with an API key, or ${selectionfile} with a helper
program.Run a program instead of a web service #
${selectionPosition} is for a helper program that shows a window next to the
selection, e.g. a dictionary popup or an Anki helper. The four integers are the
bounding box of the visible selection in screen pixels, in the same coordinate
space as Win32 SetWindowPos. It is empty if there is no visible selection.Use
Exe instead of URL to send the selection to a program. Combined with
${selectionfile} there is no length limit and no encoding problem, because
the text goes through a file rather than the command line:SelectionHandlers [
[
Name = Summarize locally
Exe = "C:\tools\summarize.exe" --pos ${selectionPosition} "${selectionfile}"
]
]
The temporary file is UTF-8 and is in your temp directory. It is reused (and
overwritten) the next time a handler runs.
Tips #
- Use
POSTorPOST-VIA-BROWSERto send more than ~8000 Latin (about 900 CJK) characters. - Inside a JSON
Bodyalways use${selectionjson}, not${selection}. - Use
Exewith${selectionfile}for no length limit and no encoding to worry about. - Try a local LLM via Ollama first. It needs no API key, and nothing leaves your computer.
- Keep
SelectToolbarNameOrSvglabels short; every one widens the selection toolbar. - Remove API keys from
Headersbefore sharing your settings file.
Placeholders #
The placeholders below can be used in
URL, Exe, and Body:| Placeholder | Replaced with |
|---|---|
${selection} |
the selected text. URL-encoded in URL, raw in Body / Exe |
${selectionjson} |
the selected text escaped for a JSON string (no surrounding quotes) |
${selectionfile} |
path to a temporary UTF-8 file holding the selection |
${selectionPosition} |
the selection’s bounding box in screen pixels, x,y,dx,dy |
${userlang} |
language code of the current UI language, e.g. de for German |
Selected text often contains quotes and newlines, and putting those into a JSON
body raw produces invalid JSON that the service rejects. Inside a JSON body
always use
${selectionjson}, never ${selection}:Body = {"text": "${selectionjson}", "target": "de"}
Examples for real services #
The examples are starting points. Check the service’s own documentation for the
current endpoint and parameter names, because they may no longer match.
DeepL API #
DeepL takes form-encoded parameters and an API key in a header. Free accounts
use
api-free.deepl.com, and paid ones use api.deepl.com:SelectionHandlers [
[
Name = DeepL to German
URL = https://api-free.deepl.com/v2/translate
Method = POST
ContentType = application/x-www-form-urlencoded
Body = text=${selection}&target_lang=DE
Headers = Authorization: DeepL-Auth-Key your-key-here
]
]
The example puts the raw selection into a form-encoded body. If your text can
contain
& or =, prefer DeepL’s JSON API with ${selectionjson} instead.A local LLM via Ollama #
Ollama runs on your own machine and needs no API key, so nothing leaves your
computer. It is a good thing to try first:
SelectionHandlers [
  [
    Name = Summarize with Ollama
    URL = http://localhost:11434/api/generate
    Method = POST
    ContentType = application/json
    Body = {"model": "llama3", "prompt": "Summarize this:\n\n${selectionjson}", "stream": false}
  ]
]
An OpenAI-compatible chat API #
Any service that uses the OpenAI chat-completions protocol, e.g. OpenAI itself
or a local server such as LM Studio, works the same way:
SelectionHandlers [
  [
    Name = Explain this
    URL = https://api.openai.com/v1/chat/completions
    Method = POST
    ContentType = application/json
    Body = {"model": "gpt-4o-mini", "messages": [{"role": "user", "content": "Explain:\n\n${selectionjson}"}]}
    Headers = Authorization: Bearer sk-your-key-here
  ]
]
The reply is shown as raw JSON in a notification. To read a long answer, a
helper program using
Exe and ${selectionfile} is more comfortable.A warning about API keys #
Anything in
Headers is stored in plain text in your settings file, which is
not encrypted. Don’t put a key there that you would mind someone reading if they
got hold of the file, and remove keys before sharing your settings. Prefer keys
that are scoped and revocable.POST also sends your selected text to whichever server you configured. The
feature is meant to do that, so be careful about which documents you use it on.See also #
- Customize toolbar:
ToolbarCustomLayout, SVG icon format - Customize keyboard shortcuts:
Keyformat - Command Palette: run handlers by name
- Commands: ids for
SelectionToolbarLayout